
Apr 19, 2022 | EZClaim
For over two decades, EZClaim’s foremost goal has been to make medical billing easier and more efficient. Let’s look at the features in EZClaim that h.
Templates
Templates are a great way to save time and ensure accuracy by pre-filling fields that will be consistent across patients or claims. EZClaim has two types of templates to choose from
Patient templates
Patient templates can be used to pre-fill patient demographic information. These templates are extremely useful and flexible across a range of scenarios where you know that patient demographic information will be the same.
For example, if your office has one doctor that only serves Medicare patients, you can easily create a template that will pre-fill Medicare as the payer for that doctor. Maybe you have a payer that requires a specific qualifier. This can be quickly loaded from a template with the necessary fields pre-filled.
Claim templates
Claim templates work much the same way that patient templates do. They make it easy to create claims around “standard” visits. In pediatrics, a common usage might be a claim template for a well-visit and immunizations. Standardizing these visits with a template not only saves you time but also helps ensure you are collecting all the applicable charges and that nothing gets left off.
Another common example that we see is using templates for modifiers for tele-health visits. The template gives you a standard foundation to make sure everything is in order.
A similar functionality that many find useful is using the “previous claim” pre-fill functionality. This copies the fields from the previous claim into a new one, which you can then alter as needed.
Both patient and claim templates serve as a flexible tool to standardize your process, reducing repetition and increasing accuracy.
Validation rules
Another great tool to ensure clean claims is by validating inputs. EZClaim comes with several default validation rules, for example, a billing provider must be set before the claim can be submitted. This tool can also be used to create custom rules. Rules can be set around how to validate:
- Patient entries
- Payer entries
- Physician/Facility entries
- Sending claims
Like the templating functionality, validation rules are extremely flexible and can be adapted to your individual needs. As an example, one custom validation rule revolves around Medicare member numbers—because we know that all Medicare member numbers are 11 characters, we can set a validation rule that enforces 11 characters for all claims where Medicare is set as the payer. Maybe for your use case certain CPT codes require extra documentation, or certain types of claims that should be flagged for extra review before being submitted. These rules can all be standardized and enforced with custom validation rules.
It might be the case that certain rules have exceptions. Validation rules can be set up to trigger with an error, so that the claim cannot be submitted, or with a warning, so that the user is made aware that a rule has been broken but it will not prevent the claim from being submitted. Custom rules are a powerful tool and must be used with caution—you don’t want to prevent clean claims from being sent out. However, if you find that you are continually running into a particular issue with a category of claims, it can be a great way to ensure accuracy.
May 18, 2021 | Denied Claims, RCM Insight
Last month we looked at tools for getting clean claims out the door on the first try. Many billers or practices stop monitoring claims once the leave the practice management program, but this is where you are likely losing money. The unfortunate truth is you need to use the tools available to you to catch rejected and denied claims to ensure proper and timely payment. Today we will look at rejections and denials, and the resources you have (or need) to work efficiently.
The terms rejection and denial are used interchangeably in the billing world but they have distinct differences, including how you are notified. Let’s start with defining the differences.
Rejected Claims
- Claims can be rejected by the clearinghouse OR the payer
- Rejections are based on submission guidelines
- Rejected claims have not been entered into your payers system for adjudication
- Notified through a claim status report (ANSI 277) that comes back into most practice management programs from the clearinghouse
- Corrections do not require a resubmission code
Denied Claims
- Claims are denied by your payer
- Denials are based on policy coverage
- Denials have been accepted for adjudication and deemed unpayable
- Notified on remittance advice (ANSI 835/ERA)
- Payers may require a resubmission code and original reference number when submitting a corrected claim
If you are using a clearinghouse and receiving your claim status reports electronically, you will be notified quickly about rejected claims. There are two ‘checkpoints’ that will look for errors. The first is your clearinghouse, the second is the payer.
At each checkpoint claims will be Rejected or Accepted, these status updates come to you through a claim status report. If your practice management system is able to process these reports (ANSI 277) your claims will be updated with the accepted or rejected information you will be able to correct any rejected claims within your practice management system. When you see an error, start with checking who has rejected your claim. This will be the point of contact if you have questions about the rejection or how to correct it. If you are not already, make it a daily task to get your reports, correct any rejected claims, and resubmit those claims.
When a claim has been accepted by your clearinghouse and the payer it enters the adjudication system. This is where the payer will make a determination on payment based on the members coverage and your contract. The denials will appear on your remittance advice with a payment or as a zero dollar payment, indicating that they have reviewed your claim and they have determined no payment is applicable. If you are enrolled with you payer for electronic remittance advice (ERA) this file will come electronically and your practice management system will be able to list or identify denied claims. These claims will either need to be researched further for clarification on the denial or written off. It is vital that your practice management system can handle these scenarios appropriately so you do not lose money for payable services.
This is another scenario where technology can seem scary. However, efficiently monitoring and working is well worth the learning curve. If you are already sending electronically and not using the claim status report or electronic remittance advice – coordinate with your clearinghouse and practice management system to find out how these reports can save you time and money.
If you would like more information on creating workflows for rejections, denials, or enrolling with a clearinghouse, let RCM Insight help! Visit us at www.rcminsight.com to request a consultation.
[Contribution by Stephanie Cremeans with RCM Insight]
Apr 5, 2021 | EZClaim Premier, Features, Medical Billing Software Blog
EZClaim medical billing software has many features built into the program to help you submit clean claims for quick payment and some that can be customized to fit your specific needs. This post will look at the ability to create customized validation rules.
Your EZClaim program already includes standard validation rules. To access these rules and create your own, press CTRL-ALT-V. This will open the Rule Library.
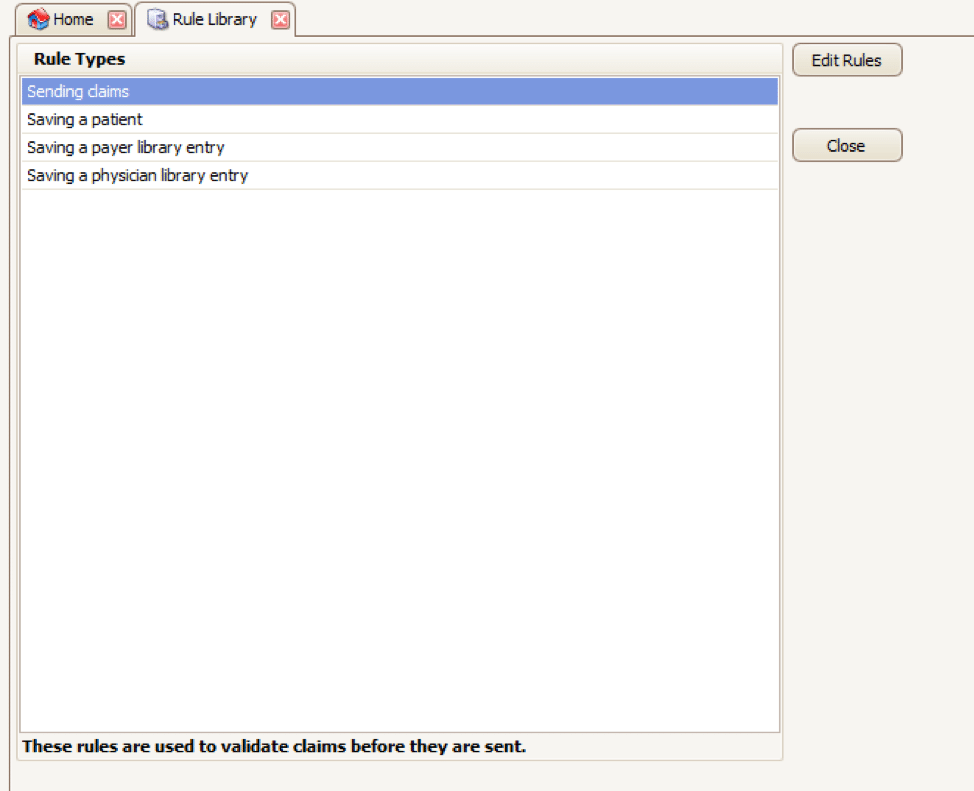
Here you will find four different types of rules to work with, rules related to:
- Sending claims
- Saving a patient
- Saving a payer library entry
- Saving a physician library entry
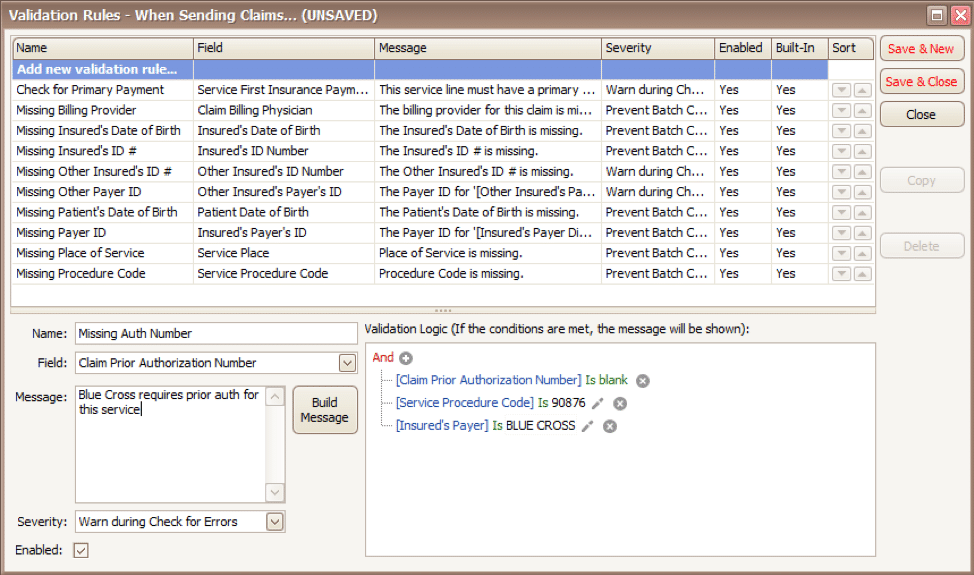
Now, click on the rule type you would like to work with and click Edit Rules. A list of rules that are already in the program will appear, along with the option at the top to “Add new validation rule“.
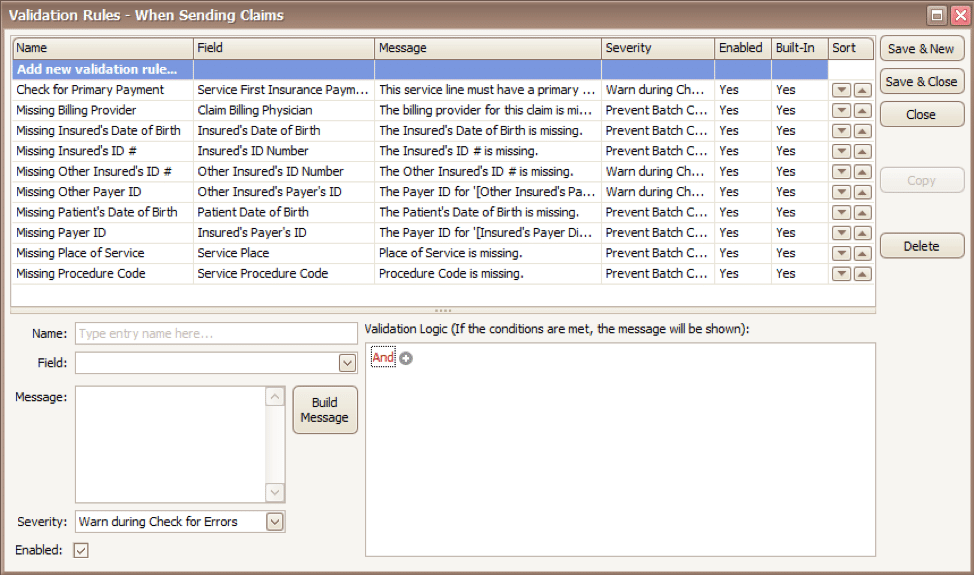
To get started, you will fill in the fields on the bottom left side of the screen:
Name: Name the rule anything you would like
Field: This is the field in Premier that you want to validate
Message: This is the message that will show when the error is encountered (consider using casual wording or extra punctuation so it is easily identified as a custom rule rather than a default rule)
Severity: Do you want the program to simply warn you that there may be an error or stop you from completing the task?
Next, you will build the logic for the validation of the field you have named above. In the example below, the rule has been created to warn users if ALL the following statements are true:
- Authorization Number is blank
- Procedure Code is 90876
- Payer is Blue Cross
Before you begin working with your validation rules it is extremely important to keep the following in mind:
- Rules are created to check for bad or missing data, not to confirm good data.
- Rules in the Sending Claims area may prevent batches from being created.
- If you wish to bypass a built-in validation rule you may disable it, if you want to customize it you can Copy the rule, update, and disable the original rule.
- Rules are the sole responsibility of the practice, EZClaim cannot troubleshoot custom validation rules.
As you can see, custom rules allow you to be very specific and can include multiple data points. Learning to use validation rules can be tricky and may take a few tries to get the rule built correctly. However, once you have the rule in place you can avoid payment delays and needing to resubmit claims.
ABOUT EZCLAIM:
EZClaim is a medical billing and scheduling software company that provides a best-in-class product, with correspondingly exceptional service and support. Combined, they help improve medical billing revenues. To learn more, visit EZClaim’s website, email them, or call them today at 877.650.0904.

Apr 5, 2021 | Claim Status Inquiry, Claims, Denied Claims, RCM Insight
If a medical billing program has “scrubbing,” why did my medical billing claim still get denied? It is a common question that we are going to answer today.
First, let’s get a better understanding of the words we are talking about. In the medical billing world, validation and scrubbing tend to be used interchangeably. While they are similar – they are not actually the same. Understanding what you have and what you need will help you submit ‘clean’ claims.
According to Technopedia, data validation checks for the integrity and validity of data and ensures the data complies with the requirements. So, what requirements? Often people assume that this means payer requirements, but that is typically not standard. Validation rules are built into your practice management software and can be used for several points. Following are some common rules you may find in your program:
- Ensure NPI‘s and Tax IDs are the appropriate lengths
- Ensure patients date of birth is entered
- Ensure that a procedure code and place of service are present on each claim
While these scenarios are standard across the industry, there may be other situations that a validation rule can help. Some programs will allow you to create custom rules for your practice. A customized validation rule will allow you to create a rule for a payer requirement. For instance, you could create a rule to prevent the following:
- Do you have a code that always requires a modifier, but only for a specific payer?
- Work with pediatrics and always need the ‘relationship to insured’ to read something other than self
- How about insurance ID numbers that are a specific alpha-numeric combo, like 3 letters followed by 9 digits?
Keep in mind, if you are creating validation rules the program will make sure that the criteria are met based on the rule entered into your software. When creating custom rules, it is important to note that this will not verify payer billing guidelines. You will need to obtain information directly from your payer to create a rule that coincides with their policies.
Once any validation errors have been addressed your claims will go to the clearinghouse you are working with. Most clearinghouses offer claim scrubbing for an additional fee. Technopedia defines data scrubbing as the procedure of identifying and then modifying or removing incomplete, incorrect, inaccurately formatted, or repeated data.
Claim scrubbing is available in several ways. It may be used within your practice management system, your clearinghouse, or even a third-party vendor. Claim scrubbing services can vary greatly in what they are looking for.
Once the claim has left your practice management system it will likely go through at least 2 scrubbing programs—one with the clearinghouse and one with your payer, prior to accepting the claim for processing. When claims are found to have an error, these results are sent back through a Claim Status Report (ANSI 277 file or a human-readable text file). This report will include information about why the claim cannot be processed. This report will also indicate whether it is the clearinghouse or the payer that is rejecting the claim. If you have further questions about the rejection, you will need to contact the entity that has rejected it.
Checking the Claim Status Reports on a regular basis will help you correct the errors and resubmit in a timely manner. In addition, the information you have gathered from the rejections can be used to update internal processes or create customized validation rules to prevent future rejections for the same error–saving you time and money!
RCM Insight is a medical billing company that uses EZClaim’s medical billing software. For any details that have to do with claims validation and “scrubbing,” contact RCM Insight directly.
ABOUT EZCLAIM:
EZClaim is a medical billing and scheduling software company that provides a best-in-class product, with correspondingly exceptional service and support. Combined, they help improve medical billing revenues. To learn more, visit EZClaim’s website, e-mail them, or call them today at 877.650.0904.
[ Contribution by Stephanie Cremean’s with RCM Insights ]